
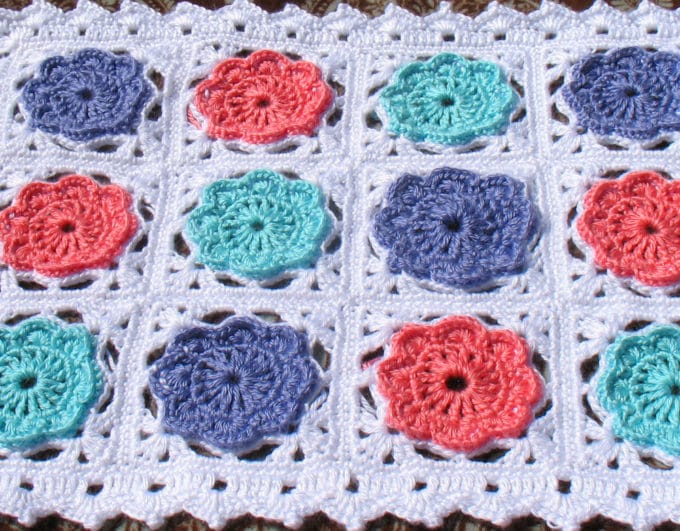
With this pattern you may make a very attractive Blossom Blanket for a baby crib, and/or a Doll Blanket for an 18 inch Doll.
DISCLOSURE This post contains affiliate links. If you choose to purchase the product or service via my affiliate link, I will get a small commission. This is at no extra cost to you, but it helps me to run this site. Buying the materials necessary to create new designs, and subsequently sharing it with you. I only recommend products that I like, and have used myself. Thank you for your support.
SKILL LEVEL
Intermediate
MATERIALS
Caron Simply Soft (100% acrylic 6oz/170g; 315yds/288m)
- Main Color (MC)
(9701 White) – approx. 240 yds (4 balls); - Flower Color
(9756 Lavender Blue) – approx. 60 (420) yds;
(0015 Strawberry) – approx. 60 (420) yds;
(9780 Robin Egg) – approx. 60 (420) yds;
Suggested yarn: Pound of Love® Yarn
CROCHET HOOK
G6 (4.00 mm) crochet hook, OR SIZE TO OBTAIN GAUGE.
GAUGE
15 dc and 7 rows to 4”/10 cm, using G6 (4.00mm) crochet hook.
(Note: Be sure to check your gauge before starting to crochet. If the gauge is larger, change to a smaller hook size, or work tightly. If it is smaller, change to a larger hook size, or work loosely.)
FINISHED MEASUREMENTS
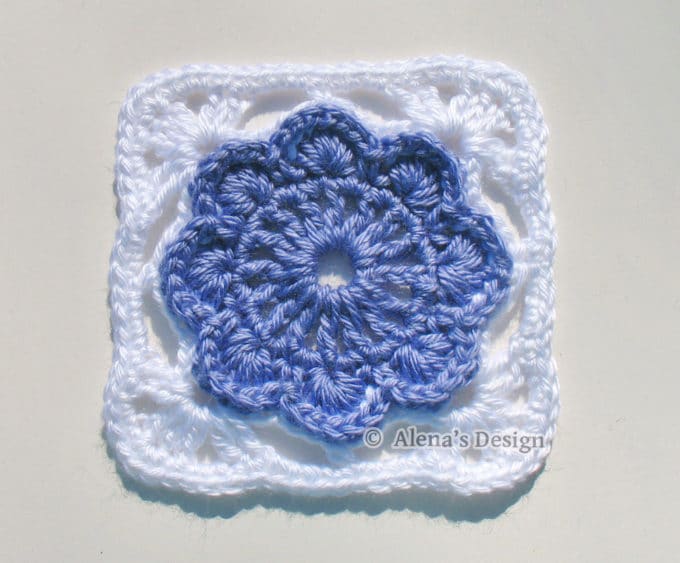
Square – approx. 4.5 inches
Doll Blanket – 21.0 x16.5 inches
Baby Blanket – 57.0 x 30.0 inches
SPECIAL STITCH
Picot = Ch 3, sl st into third ch from hook.
INSTRUCTIONS
Notes:
- Instructions are written for the smallest size with changes for larger sizes given in parentheses. When only one number is given, it applies to all sizes.
- Weave in loose ends as work progresses.
- Ch 3 at beg of rounds count as dc throughout.
- Ch 1 (ch 2) at beg of rounds does not count as st throughout.
- When changing color always complete last half of last st worked with next color, keep yarn not used to back of work.
- To avoid mistake(s), count stitches in each round when finished.
SQUARE
For Doll Blanket
Make 12, 4 each of 3 flower color.
For Baby Blanket
Make 72, 24 each of 3 flower color.
With flower color, ch 7, join with sl st in first ch to form a ring.
Rnd 1: Ch 4, work [dc, ch 1] 15 times in ring; join with sl st in third ch of beg ch 4 – 16 dc and 16 ch-1 sps.
Rnd 2: Ch 1 (does not count as st), * 2 sc in next ch-1 space; rep from * around; join with sl st in first sc – 32 sc.
Rnd 3: Ch 2 (does not count as st), 4 dc in first sc, skip next st, sc in next st, * skip next st, 7 dc in next st, skip next st, sc in next st; rep from * around, end skip last st, 3 dc in first sc; join with sl st in first dc – 56 dc and 8 sc.
Cut flower color yarn. Join MC.
Rnd 4: Ch 1, BPsc around next 4 dc, skip sc, BPsc around next 3 dc, ch 3, skip dc, BPsc around next 3 dc, skip sc, * BPsc around next 7 dc, skip sc, BPsc around next 3 dc, ch 3, skip dc, BPsc around next 3 dc, skip sc; rep from * around, end BPsc around last 3 dc; join with sl st in first BPsc – 52 BPsc and 4 ch-3 sps.
Rnd 5: Ch 1, sc in same st, ch 3, skip 6 sts, (2 dc, ch 2, 3 dc, ch 2, 2 dc) in next ch-3 space, * ch 3, skip 6 sts, sc in next st, ch 3 skip 6 sts, (2 dc, ch 2, 3 dc, ch 2, 2 dc) in next ch-3 space; rep from * around; end ch 3, skip last 6 sts; join with sl st in first sc – 72 sts.
Rnd 6: Ch 1, * sc in next sc, 3 sc in next ch-3 space, sc in each of next 2 dc, 2 sc in next ch-2, sc in next dc, 3 sc in next dc, sc in next dc, 2 sc in next ch-2, sc in each of next 2 dc, 3 sc in next ch-3 sp; repeat from * around; join with sl st in first sc – 80 sts. Fasten off.
JOINING
Arrange Squares as desired with 4 (12) rows containing 3 (6) squares in each row. Hold two Squares with RS tog and working through both thicknesses, sew sides with whip stitches. Trim yarn. Continue sewing until all are joined in 4 (12) rows of 3 (6) Squares each. Hold 2 rows of Squares with RS tog and working through both thicknesses, sew rows with whip stitches. Trim yarn. Continue sewing until all rows are joined tog.
Note: You may want to use this video tutorial on how to join the squares together.
EDGING
With RS and long edge of blanket facing you, attach MC with sl st in right corner.
For Doll Blanket only
Rnd 1: Ch 1 (does not count as st), * (sc, ch 3, sc) in corner sc, 20 sc in each square across long edge to last square, 19 sc in last square; 79 sc total, (sc, ch 3, sc) in corner sc, 20 sc in each square across short edge to last square, 21 sc in last square; 61 sc total, rep from * around once; join with sl st in first sc – 288 sc and 4 ch-3 sps.
For Baby Blanket only
Rnd 1: Ch 1 (does not count as st), * (sc, ch 3, sc) in corner sc, 20 sc in each square across long edge to last square, 21 sc in last square; 241 sc total, (sc, ch 3, sc) in corner sc, 20 sc in each square across short edge to last square, 21 sc in last square; 121 sc total, rep from * around once; join with sl st in first sc – 732 sc and 4 ch-3 sps.
For ALL sizes
Rnd 2: Sl st in ch-3 sp, ch 2 ( does not count as st), * (2 dc, ch 3, 2 dc) in corner ch-3 sp, dc in next st, ch 1, skip next st, [dc in each of next 5 sts, ch 1, skip next st] across to last dc before next corner, dc in next st; rep from * around; join with sl st in first dc – 254 (624) dc, 50 (124) ch-1 sps, and 4 ch-3 sps.
Rnd 3: Ch 1, * (3 dc, Picot, 3 dc) in corner ch-3 sp, skip next st, sc in next st, (3 dc, Picot, 3 dc) in next ch-1 sp, [sc in center dc of next 5-dc group, (3 dc, Picot, 3 dc) in next ch-1 sp] across to last 3-dc group before next corner, skip next st, sc in next st; rep from * around; join with sl st in first dc. Fasten off.

STITCH ABBREVIATIONS
approx – approximately; beg – beginning; BPsc – Back Post single crochet; ch – chain; dc – double crochet; dc2tog – double crochet two together; hdc – half double crochet; lp(s) – loop(s); MC – main color; rem – remain/remaining; rep – repeat; Rnd(s)- round(s); RS – right side; sc – single crochet; sc2tog – single crochet two sts together; sl st – slip stitch; sp – space(s); st(s) – stitch(es); WS – wrong side; yo – yarn over; [ ] – work directions inside brackets as many times as directed; ( ) – work instructions within parentheses in the stitch or space indicated; * – repeat the instructions following the single asterisk as directed; “ – inches
You may get the PDF pattern here
This pattern is protected by copyright. You may not rewrite, photocopy, redistribute, or sell the patterns in any form. You have my permission to sell the finished product if you will credit me for the pattern with a link to my site: www.www.alenasdesign.com when listing or selling the items made from patterns. If you need any help with my patterns, you may contact me: www.alenasdesign.com/contact-us