
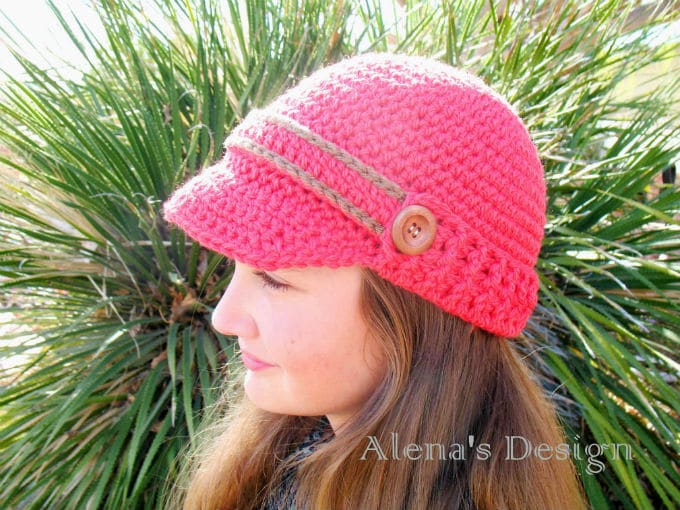
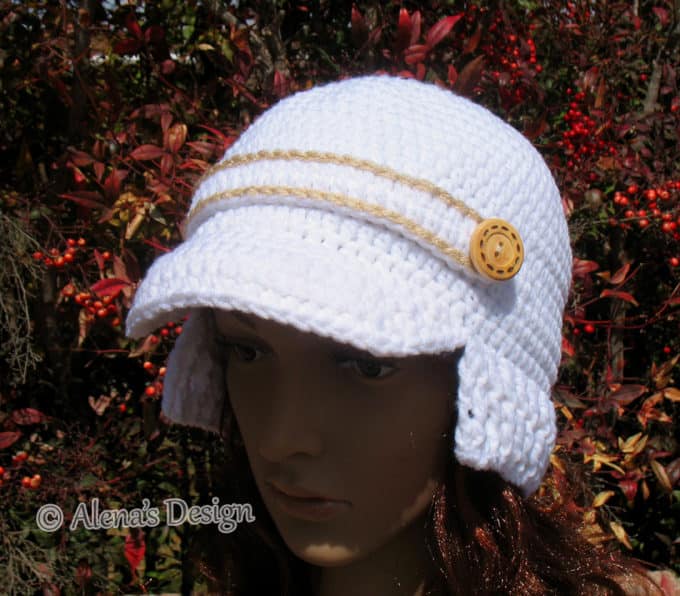
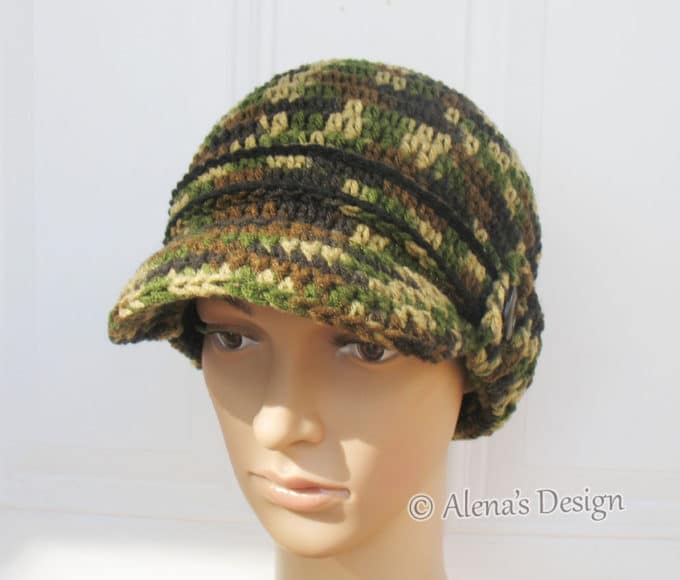
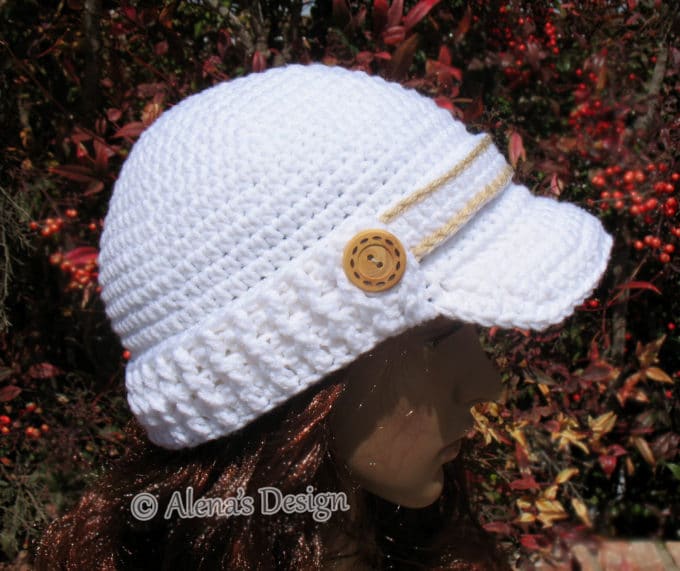
The visor is perfect for keeping the sun out of your eyes. The strap with buttons is a special charming accent. The rolled up ribbed brim makes a double layer, and has a button hole which enables it to be worn down or up.
SKILL LEVEL
Easy
SIZE AND FINISHED MEASUREMENTS
6-12 months – 16.5” around, 6.0” tall;
12-24 months – 18.5” around, 6.5” tall;
Small Child – 19.5” around, 6.75” tall;
Large Child – 21.5” around, 7.0” tall;
Teen/Adult – 22.5” around, 7.5” tall;
Adult – 24.0” around, 8.0” tall;
MATERIALS
Red Heart Super Saver (100% acrylic 7oz/198g; 364yds/333m); Worsted weight; medium
- Main Color (MC) 971 Camo – approx. 120 -190 yards;
or Sugar ‘n Cream Yarn (100% Cotton; 70.9 g/ 2.5oz.; 109 m/120yds); Worsted weight; approx. 120 – 190 yards;
- Main Color (MC) 1005 White – approx. 120 -190 yards;
- Contrast A – small amount of contrasting color;
- Two buttons, about 7/8“(23 mm);
- Matching thread and needle.
CROCHET HOOK
H8 /5.00 mm and I/5.50 mm crochet hooks, OR SIZE TO OBTAIN GAUGE.
GAUGE
13 hdc and 11 rows to 4”/10 cm, using H8 /5.00 mm crochet hook.
(Note: Be sure to check your gauge before starting to crochet. If the gauge is larger, change to a smaller hook size, or work tightly. If it is smaller, change to a larger hook size, or work loosely.)
INSTRUCTIONS
- Instructions are written for the smallest size with changes for larger sizes given in parentheses. When only one number is given, it applies to all sizes.
- For ease in working, circle all numbers pertaining to size you’re making.
- To avoid mistake(s), count stitches in each round, or row when finished.
- A hat is worked in in continuous rounds from top to bottom.
HAT
Note: Work in continuous rounds without joining. Place a marker in first st of first rnd and move up each rnd.
Rnd 1: With MC and smaller hook, ch 2, 8 hdc in second ch from hook – 8 sts.
Rnd 2: 2 hdc in each st around – 16 sts.
Rnd 3: *Hdc in first hdc, 2 hdc in next st; rep from * around – 24 sts.
Rnd 4: *Hdc in each of next 2 sts, 2 hdc in next st; rep from * around – 32 sts.
Rnd 5: *Hdc in each of next 3 sts, 2 hdc in next st; rep from * around – 40 sts.
Rnd 6: * Hdc in each of next 4 sts, 2 hdc in next st; rep from * around – 48 sts.
For size 6-12 months only
Rnd 7: *Hdc in each of next 7 sts, 2 hdc in next st; rep from * around – 54 sts.
For size 12-24 months only
Rnd 7: *Hdc in each of next 5 sts, 2 hdc in next st; rep from * around – 56 sts.
Rnd 8: Hdc in each of next 13 sts, 2 hdc in next st; rep from * around – 60 sts.
For size Small Child only
Rnd 7: *Hdc in each of next 5 sts, 2 hdc in next st; rep from * around – 56 sts.
Rnd 8: *Hdc in each of next 6 sts, 2 hdc in next st; rep from * around – 64 sts.
For size Large Child only
Rnd 7: *Hdc in each of next 5 sts, 2 hdc in next st; rep from * around – 56 sts.
Rnd 8: *Hdc in each of next 6 sts, 2 hdc in next st; rep from * around – 64 sts.
Rnd 9: *Hdc in each of next 15 sts, 2 hdc in next st; rep from * around – 68 sts.
For size Teen/Adult only
Rnd 7: *Hdc in each of next 5 sts, 2 hdc in next st; rep from * around – 56 sts.
Rnd 8: *Hdc in each of next 6 sts, 2 hdc in next st; rep from * around – 64 sts.
Rnd 9: *Hdc in each of next 7 sts, 2 hdc in next st; rep from * around – 72 sts.
For size Adult only
Rnd 7: *Hdc in each of next 5 sts, 2 hdc in next st; rep from * around – 56 sts.
Rnd 8: *Hdc in each of next 6 sts, 2 hdc in next st; rep from * around – 64 sts.
Rnd 9: *Hdc in each of next 7 sts, 2 hdc in next st; rep from * around – 72 sts.
Rnd 10: *Hdc in each of next 11 sts, 2 hdc in next sts; rep from * around – 78 sts.
For All sizes
Next Rnd: Hdc in each sts around – 54 (60, 64, 68, 72, 78) sts.
Rep last rnd until hat measures 5.5” (6.0”, 6.5”, 6.75”, 7.25”, 7.75“)‘’ from beg;
Last Rnd: Hdc in each sts around to marker; sc in next st, sl st in next st. Do not turn or fasten off. Begin work on Visor as written below for size that you make.
VISOR 6-12 months, 12-24 months and Small Child only.
Note: Ch 1 at beg of rnds does not count as sc throughout.
Row 1: With smaller hook, ch 1, FPsc around each post of next 21 (21, 23) sts – 21 (21, 23) sts. Place marker in next st for joined placement. Ch 1, turn.
Row 2: Sc2tog, sc in each of next 5 sts, work 2 sc in next st, sc in each of next 5 (5, 7) sts, work 2 sc in next st, sc in each of next 5 sts, sc2tog – 21 (21, 23) sts. Ch 1, turn.
Row 3: Sc2tog, sc in each st to last 2 sts, sc2tog – 19 (19, 21) sts. Ch 1, turn.
Row 4: Sc2tog, sc in each of next 4 sts, work 2 sc in next st, sc in each of next 5 (5, 7) sts, work 2 sc in next st, sc in each of next 4 sts, sc2tog – 19 (19, 21) sts. Ch 1, turn.
Row 5: Sc2tog, sc in each st to last 2 sts, sc2tog – 17 (17, 19) sts. Fasten off.
VISOR (second piece)
With MC and smaller hook, ch 22 (22, 24).
Rows 1-4: Repeat Rows 2-5 for Visor as written above. Fasten off.
VISOR Large Child, Teen/Adult and Adult only.
Note: Ch 1 at beg of rnds does not count as sc throughout.
Row 1: With smaller hook, ch 1, FPsc around each post of next 25 (27, 27) sts – 25 (27, 27) sts. Place marker in next st for joined placement. Ch 1, turn.
Row 2: Sc2tog, sc in each of next 6 sts, work 2 sc in next st, sc in each of next 7 (9, 9) sts, work 2 sc in next st, sc in each of next 6 sts, sc2tog – 25 (27, 27) sts. Ch 1, turn.
Row 3: Sc2tog, sc in each st to last 2 sts, sc2tog – 23 (25, 25) sts. Ch 1, turn.
Row 4: Sc2tog, sc in each of next 5 sts, work 2 sc in next st, sc in each of next 7 (9, 9) sts, work 2 sc in next st, sc in each of next 5 sts, sc2tog – 23 (25, 25) sts. Ch 1, turn.
Row 5: Sc2tog, sc in each st to last 2 sts, sc2tog – 21 (23, 23) sts. Ch 1, turn.
Row 6: Sc2tog, sc in each st to last 2 sts, sc2tog – 19 (21, 21) sts. Fasten off.
VISOR (second piece)
With MC and smaller hook, ch 26 (28, 28).
Rows 1-5: Repeat Rows 2-6 for Visor as written above. Fasten off.
For All sizes
Trace around visor onto paper. Use this paper pattern to cut out visor liner from plastic canvas (optional).
Then work on Joining Visors as written below.
Joining Visors
With larger hook, and RS of work facing you, join two strands of MC yarn with sl st to lower edge of Hat at previous st of Visor. Hold two Visors with WS together and working through both thicknesses.
Ch 1, work 5 (5, 5, 6, 6, 6) sc up side of right visor edge, work sc in each sc across edge of visor front, 5 (5, 5, 6, 6, 6) sc down side of left visor edge. Cut one strand, leaving long tail for sewing. Continue to work with remaining strand; sl st in marked st, remove the marker, sl st in next st. Do not turn or fasten off. Begin work on Ribbed Brim as written below.
RIBBED BRIM
Row 1: Ch 2 (count as 1st dc), dc in same st, work in front loop of st for this row only, 2 dc in next st, dc in each st across to last two sts to opposite side of Visor, end 2 dc in each of last two sts – you should have an odd number of sts. Turn.
Row 2: Ch 2, * BPdc around post of next st, FPdc around post of next st; rep from * across. Turn.
Row 3 (buttonhole row): Ch 2, FPdc in next st, ch 1, skip next st (buttonhole made), FPdc in next st, * BPdc in next st, FPdc in next st; rep from * across to last three sts, end ch 1, skip next st (buttonhole made), FPdc in next st, BPdc in last st. Turn.
Row 4: Ch 2, BPdc in next st, dc in next ch-1 space, BPdc in next st, * FPdc in next st, BPdc in next st; rep from * across to last three sts, end dc in next ch-1 space, BPdc in next st, FPdc in last st. Fasten off. Secure yarn to WS.
STRAP
With MC and smaller hook, ch 30 (30, 32, 34, 36, 36).
Rnd 1: 2 hdc in second ch from hook, hdc in each of next st to last st, 4 hdc in last st, working on opposite side of ch, hdc in each of next st to last st, end 2 hdc in last st; join with sl st in first hdc. Cut MC, join A.
Rnd 2: With A, sl st in each st around; join with sl st in first st. Fasten off. Secure yarn to WS.
FINISHING
Place plastic liner between visor pieces, trim to fit if necessary. Encase plastic liner between visor pieces (optional). Sew visor edge to cap on WS. Fold up brim. Place Strap above Visor between two buttonholes. Then, place button on top of Strap. Sew buttons through Strap to Hat corresponding to buttonholes.
STITCH ABBREVIATIONS
approx – approximately; beg – beginning; ch – chain; BPdc – Back Post double crochet; FPdc – Front Post double crochet; FPsc – Front Post single crochet; lp(s) – loop(s); MC – main color; rep – repeat; Rnd(s)- round(s); RS – right side; sc – single crochet; Sc2tog – single crochet two sts together; sl st – slip stitch; sp – space(s); st(s) – stitch(es); WS – wrong side; yo – yarn over; ( ) – work instructions within parentheses as many times as directed; * – repeat the instructions following the single asterisk as directed; “ – inches
The PDF pattern you may get here
This pattern is protected by copyright. You may not rewrite, photocopy, redistribute, or sell the patterns in any form. You have my permission to sell the finished product if you will credit me for the pattern with a link to my site: https://www.alenasdesign.com/ when listing or selling the items made from patterns. If you need any help with my patterns, you may contact me: www.alenasdesign.com/contact-us
very good